Difference between revisions of "SEED Viewer Manual/Editing Capabilities/CreateFeature"
| (2 intermediate revisions by the same user not shown) | |||
| Line 19: | Line 19: | ||
Clicking the second button, '''blastp''' will perform a protein based BLAST of the region selected in the '''Sequence Table'''. For this, you have to choose a '''start'''codon in the table. The sequence taken for the BLAST comparison is the translated protein sequence of the region from that start codon to the next stop codon in that frame. Note that you do not select a '''stop''' codon. If you select a '''stop''' codon, this will be ignored for defining the sequence region. | Clicking the second button, '''blastp''' will perform a protein based BLAST of the region selected in the '''Sequence Table'''. For this, you have to choose a '''start'''codon in the table. The sequence taken for the BLAST comparison is the translated protein sequence of the region from that start codon to the next stop codon in that frame. Note that you do not select a '''stop''' codon. If you select a '''stop''' codon, this will be ignored for defining the sequence region. | ||
| + | |||
| + | The blast search will result in a [[WebComponents/Table|table]] with all hit proteins. The table shows the hit feature and it's function. You can select a function in this table for the new protein you want to create, instead of putting in a new on in the '''Control TabView''' above. | ||
If you have selected a '''start''' codon in the '''Sequence Table''', you can also directly create the feature for that region if you are sure about it. Clicking the '''create''' button will do that. | If you have selected a '''start''' codon in the '''Sequence Table''', you can also directly create the feature for that region if you are sure about it. Clicking the '''create''' button will do that. | ||
[[Image:CNFActions.png]] | [[Image:CNFActions.png]] | ||
| + | |||
| + | === Sequence Table === | ||
| + | |||
| + | The sequence table is a table of the codons in a genomic region. Each cell represents a triplet. The first line of each line is the translation of that triplet to amino acid. A ''*'' stands for a '''stop''' codon. The second line shows the actual triplet (the codon). | ||
| + | |||
| + | The third line can have dots (...), forward arrows (>>>) or reverse arrows (<<<). Dots mean that there not feature overlaps this part of the region. Forward arrows represent a feature on the forward strand, reverse arrows on the reverse strand. This way, you can see if the feature you want to create overlaps with an already present feature in that region. | ||
| + | |||
| + | The fourth line sometimes has a check box or a radio box. Radio boxes are shown for every '''start''' codon. A cell with a start codon is also painted in a green color. Check a radio box to mark the start of the feature. RBS binding sites (purple colored cells) can help to determine the right start codon. Check boxes are used for '''stop''' codons (cells with red color). Check the check box of a '''stop''' codon to ignore it, meaning that the feature be continue to the next (unchecked) '''stop''' codon. | ||
[[Image:CreateNewFeature.png]] | [[Image:CreateNewFeature.png]] | ||
Latest revision as of 10:02, 5 December 2008
Editing Capabilities - Create Feature
This page lets you create a new protein feature. It consists of three parts, a Control TabView, an Actions panel and the Sequence Table.
Control TabView
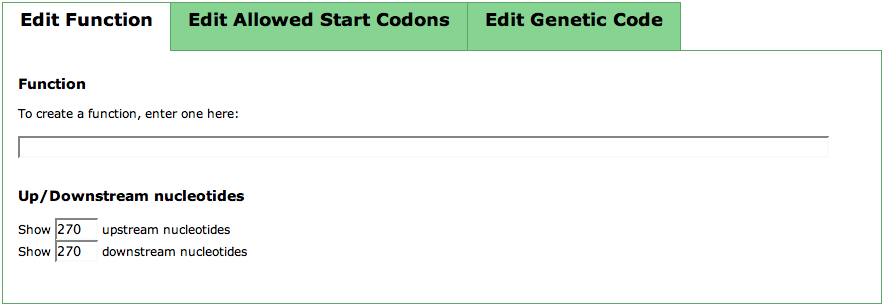
In the first tab of this TabView, you can put in a function for your newly created feature by just entering it into the text field. Below that, you can see two text fields for controlling Up/Downstream Nucleotides'. As you usually enter this page from the Search Gene Page, you have a hit region defined in which the feature is to be located. The numbers you can enter are the number of upstream and downstream nucleotides of the hit you want to see in the Sequence Table. After entering your numbers, click the update button in the Actions panel
The second tab of the TabView lists all codons of the genetic code. Here, you can select the start codons that are possible for the genome you want to create a feature in. Pre-selected are the standard start codons that are usually used for bacterial genomes. You can choose a different set of codons and press the button update in the Actions panel to change the view in the Sequence Table.
The genetic code can have small differences from the default genetic code in some organisms. You can change the standard genetic code in the third tab of the TabView. For each triplet, you can see the default amino acid that is usually used in organisms. If you want to change this for a triplet, click the respective drop down box and choose the right amino acid. To make the changes visible in the Sequence Table, press the update button in the Actions panel again.
Actions panel
The actions panel consists of three buttons. The update will let you update the Sequence Table with new parameters you can type in the Control TabView.
Clicking the second button, blastp will perform a protein based BLAST of the region selected in the Sequence Table. For this, you have to choose a startcodon in the table. The sequence taken for the BLAST comparison is the translated protein sequence of the region from that start codon to the next stop codon in that frame. Note that you do not select a stop codon. If you select a stop codon, this will be ignored for defining the sequence region.
The blast search will result in a table with all hit proteins. The table shows the hit feature and it's function. You can select a function in this table for the new protein you want to create, instead of putting in a new on in the Control TabView above.
If you have selected a start codon in the Sequence Table, you can also directly create the feature for that region if you are sure about it. Clicking the create button will do that.
Sequence Table
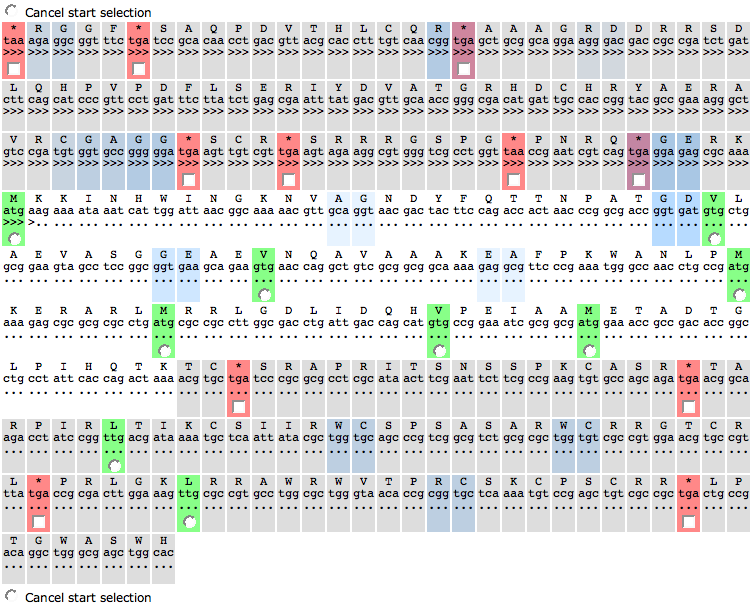
The sequence table is a table of the codons in a genomic region. Each cell represents a triplet. The first line of each line is the translation of that triplet to amino acid. A * stands for a stop codon. The second line shows the actual triplet (the codon).
The third line can have dots (...), forward arrows (>>>) or reverse arrows (<<<). Dots mean that there not feature overlaps this part of the region. Forward arrows represent a feature on the forward strand, reverse arrows on the reverse strand. This way, you can see if the feature you want to create overlaps with an already present feature in that region.
The fourth line sometimes has a check box or a radio box. Radio boxes are shown for every start codon. A cell with a start codon is also painted in a green color. Check a radio box to mark the start of the feature. RBS binding sites (purple colored cells) can help to determine the right start codon. Check boxes are used for stop codons (cells with red color). Check the check box of a stop codon to ignore it, meaning that the feature be continue to the next (unchecked) stop codon.


